
A Guide to Architectural Forensic Tools
- Aug 31, 2020
- 3 min read

By Zoe Gaik,
Architectural Forensic Associate
RGA Design Forensics
As a member in the field of architectural forensics, the tools we use are our best friends. They enable us to gather information with precision, which is especially important in a state governed by the Daubert standard, such as Florida. It is less about the amount of credentials an expert witness holds, and more about what facts they can produce to the court. This is why it is crucial for anybody involved in the field of architectural forensics or premises liability litigation to understand the tools used by professionals to collect the data that is used in court. Welcome to our Architectural Forensic Tool Guide.
1. The Typical Tape Measure
Everybody in the field should know this one already. But even though it is so common, do not overlook it! The tape measure is one of the most valuable of all the tools we use to gather data. I don’t think I’ve gone to one inspection where I did not end up using my tape measure at least once. It’s easy to use, diverse in what it can measure, and clips to your belt.

2. The Adhesive Tape Measure
This is a tool that not many know about. Adhesive tape is similar to drafting tape, but with markings designating each centimeter and inch. What I like about this tool is that it’s good for measuring round or irregular surfaces.


3. The Measuring Wheel
The measuring wheel is used for measuring longer distances, such as paths of travel and egress systems to a public way. The measuring wheel comes into play typically for any measurement past what your tape measure can do. Most times, exits must be a certain distance away from each other. This tool is used to calculate those measurements. To use this tool, first you must push the button to zero out the meter, kick up the kickstand, then roll the device along with you as you walk. Some measuring wheels measure up to 10,000 feet.

4. The Level
The level is used for determining slopes. Digital levels calculate slopes in degrees, percentages, and angles. Some will even tell you the temperature (mine does). Walkways, stairs, and ramps require a specific slope as described within the applicable building codes, fire codes, and handicap accessibility guidelines. In premises liability lawsuits, levels are useful in determining whether a slope is excessive or not.

5. The Light Meter
Light meters are used for testing the amount of light, in foot-candles or lumens, in any given area. Certain areas like stairs are required to have a certain luminance value. It is used by laying the meter and the sensor (the white bubble) flat on a surface, bubble up, to determine how much light falls on that surface.

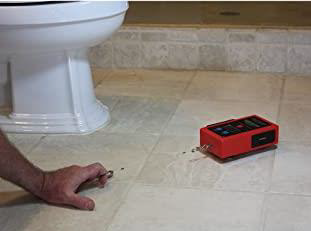
6. Coefficient of Friction (COF) Testing Materials
These materials must be used by a person who is licensed to perform COF testing. There are two ways you can get a material tested. You can send a sample to a lab that performs COF testing, or you can hire somebody to test the material on-site. We typically do the latter, because the testing results turn out more accurate. We provide this service to our clients whenever we have a slip and fall case.
Some of the materials used in COF testing are the digital gauge, which reads the amount of friction made by the subject surface against the boots of the digital gauge. The boots provide a baseline to test the subject material against. For example, say you wanted to test the Coefficient of Friction of a tile floor. Boots would be placed on the digital gauge, the digital gauge would be set on the floor (boot side down), and gently pulled across a small portion of the floor at a specific measurement of force. This produces a coefficient of friction, which can explain how much traction a floor has, and whether it falls below the required standard traction rating, possibly making it slippery. Coefficient of Friction tests can be performed dry or wet, in a static or dynamic way of testing.


The six tools mentioned above can aid anybody in performing testing for premises liability cases, enabling precise measurements to be taken. In no way is this a comprehensive list of all the tools that are out there, but these are some of the main tools RGA uses during inspections. For lawyers, understanding the existence and uses of each of these tools can further your ability to defend the data provided by your expert witness. In addition, if you would like any further explanation about any of the tools mentioned or would like to set up a teleconference to discuss a case, please contact Zoe Gaik at ZGaik@RGA-Design.com. Happy inspecting!